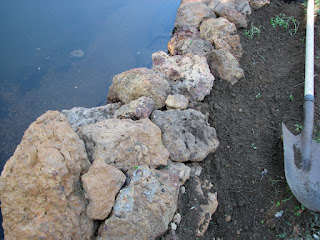
I had dug out the hole a couple of months ago, but we had to wait for the budget to build up to get the liner. It's not cheap, but hopefully will last. Anyway, I thought I'd share what we're doing and how in case it's useful to someone else out there.
THE PLAN: Having read about 'natural pools' which are all the rave in the UK and US I wanted to reproduce something like that for fish. The idea with a natural pool is that if the ratio of plants to exposed surface water area is correct, the pool doesn't need filtration or aeration. Now, this may be different here in Oz as we have far more sun which means more potential algae growth etc, but the idea intrigues me. And I wonder if we may be able to grow some trout - not heaps, just 10 or so in a pond that exists this way. There are many times in the garden where I've broken the 'rules' so to speak, because the books said X wouldn't grow in spot Y. And they did. So I'm giving this a shot - worst case scenario, it doesn't work and I put in a pump.
THE METHOD
I should add a disclaimer - I'm no expert at pond building. This is just the technique that has worked for us (having built a few I've had a little bit of practice) and as for the actual management of the pond and trout we're planning to put into it...... well that will be an experiment so stay tuned!
Ok so first - I dug a large hole! (Obviously!) Not just a hole though, a kidney sort of shape with a deep well in one end, and a 'shelf' that runs along the edge along a lot of the pond.
This provides different depths throughout the pond, and the ledge is where the plants will sit.
I cleared the bottom of the vegetation that had grown there over the last month or so. Apparently when it rots it can produce gases which will cause bubbles and your lining to rise down the track. If you dig your pond and line it straight away though, you won't have to worry about this step.
Next, I lined the bottom of the hole with newspaper and old bits of carpet. This is to prevent any sharp stones or sticks on the bottom making a hole in the lining. I feel pretty confident walking in the pond if I have to now, as the bottom is padded.
Then the liner goes in. I used a 0.7mm EPDM liner. This stuff is TOUGH! We have it in the other ponds and it has withstood a kelpie, a dobermann and geese with their claws. It's very rubbery and stretches. I wouldn't recommend using plain black plastic in Oz. The sun will break it down too quickly, and holes happen too easily. You don't want to be draining your pond to patch it if you can help it.
Fill the pond slowly. The ledge, I filled with fine gravel to anchor plants like water cress etc. Some gravel will be put in the bottom to do the same for bigger plants. NO soil goes in the water. This means the plants will clean the water because they will have to obtain ALL their nutrients from it alone.
Keep filling, levelling as you go if you're like me and didn't use a spirit level. There are some good diagrams which show cross sections of a pond if you look up 'frog pond' in Google images.
Just a tip: When you place your rocks around the pond, either choose large ones whose weight will ensure they don't shift, or make a small depression under the rear half of them so they don't go sliding into the pond when kids, dogs or anything else steps or leans on them. They need to be solid and well locked in. It's worth taking the time to do this bit right, for safety and also to stop rocks falling in and potentially damaging your lining.
Heap dirt up behind the liner fold to hold the lip in place, then cover with rocks, dirt etc. Landscape the edge as desired.
I have made an entrance point to the pond which is shallower, and the double ledge acts as shallow stairs. This is for me to get in if I have to, as well as being helpful to the ducks and frogs.
There is also a runoff point on one side of the pond, which will drain excess water in the case of a downpour and direct it to the garden below.
Part 2 in a few days when the rest is done!


1 comment:
I wish I had half your energy! looking great!
Post a Comment