Sunday, August 12, 2012

Food Pond Part 1

We have 2 small ponds which we built over the last couple of years for fish and frogs. This week I got onto our first 'serious' pond which will be an experimental aquaculture pond.

I had dug out the hole a couple of months ago, but we had to wait for the budget to build up to get the liner. It's not cheap, but hopefully will last. Anyway, I thought I'd share what we're doing and how in case it's useful to someone else out there.

THE PLAN: Having read about 'natural pools' which are all the rave in the UK and US I wanted to reproduce something like that for fish. The idea with a natural pool is that if the ratio of plants to exposed surface water area is correct, the pool doesn't need filtration or aeration. Now, this may be different here in Oz as we have far more sun which means more potential algae growth etc, but the idea intrigues me. And I wonder if we may be able to grow some trout - not heaps, just 10 or so in a pond that exists this way. There are many times in the garden where I've broken the 'rules' so to speak, because the books said X wouldn't grow in spot Y. And they did. So I'm giving this a shot - worst case scenario, it doesn't work and I put in a pump.

THE METHOD
 I should add a disclaimer - I'm no expert at pond building. This is just the technique that has worked for us (having built a few I've had a little bit of practice) and as for the actual management of the pond and trout we're planning to put into it...... well that will be an experiment so stay tuned!

Ok so first - I dug a large hole! (Obviously!) Not just a hole though, a kidney sort of shape with a deep well in one end, and a 'shelf' that runs along the edge along a lot of the pond.
This provides different depths throughout the pond, and the ledge is where the plants will sit.


I cleared the bottom of the vegetation that had grown there over the last month or so. Apparently when it rots it can produce gases which will cause bubbles and your lining to rise down the track. If you dig your pond and line it straight away though, you won't have to worry about this step.

Next, I lined the bottom of the hole with newspaper and old bits of carpet. This is to prevent any sharp stones or sticks on the bottom making a hole in the lining. I feel pretty confident walking in the pond if I have to now, as the bottom is padded.

Then the liner goes in. I used a 0.7mm EPDM liner. This stuff is TOUGH! We have it in the other ponds and it has withstood a kelpie, a dobermann and geese with their claws. It's very rubbery and stretches. I wouldn't recommend using plain black plastic in Oz. The sun will break it down too quickly, and holes happen too easily. You don't want to be draining your pond to patch it if you can help it.


Fill the pond slowly. The ledge, I filled with fine gravel to anchor plants like water cress etc. Some gravel will be put in the bottom to do the same for bigger plants. NO soil goes in the water. This means the plants will clean the water because they will have to obtain ALL their nutrients from it alone.


Keep filling, levelling as you go if you're like me and didn't use a spirit level. There are some good diagrams which show cross sections of a pond if you look up 'frog pond' in Google images.

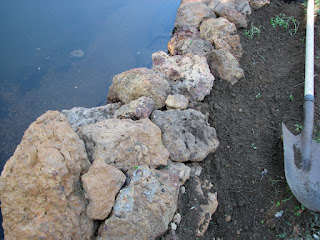
Just a tip: When you place your rocks around the pond, either choose large ones whose weight will ensure they don't shift, or make a small depression under the rear half of them so they don't go sliding into the pond when kids, dogs or anything else steps or leans on them. They need to be solid and well locked in. It's worth taking the time to do this bit right, for safety and also to stop rocks falling in and potentially damaging your lining.
Once the water reaches the bottom of the rocks, I fold up the lining behind them to make a higher lip, and fill some more so the rocks are partly submerged. I learnt from the other ponds that if you don't do this, then a bit of evaporation will have your rocks sitting proud of the water and your liner showing. Better to have them deeper to begin with so the pond always looks nice!

Heap dirt up behind the liner fold to hold the lip in place, then cover with rocks, dirt etc. Landscape the edge as desired.

I have made an entrance point to the pond which is shallower, and the double ledge acts as shallow stairs. This is for me to get in if I have to, as well as being helpful to the ducks and frogs.


There is also a runoff point on one side of the pond, which will drain excess water in the case of a downpour and direct it to the garden below.

Part 2 in a few days when the rest is done!


Thursday, June 7, 2012

Swale in Action!

I was at work today while it poured, but Hubby thought of me and send me pics of the swale!

It's deeper at one end, which I actually don't feel is a real problem but I might try to even it out a little more.

 You don't appreciate the amount of water that runs off until you catch it. Seriously stoked about this!

A few weeks time and this place should start looking quite different.


Sunday, June 3, 2012

Sweet Potato Harvest

What joy! Dug a hole today for a Pitaya and discovered a decent sized tuber. So we thought we'd dig up the small patch of sweet potatoes. What a haul!
These have got to be my new favourite veg. Looking forward to dinner tomorrow night!


Thursday, May 31, 2012

Swale and 2nd Food Forest

Now that things are in swing in Zones 0-2, it's time to start taking steps in Zone 3. The plan - to have a self-sustaining food forest which doesn't rely on watering - so hardy species down here as opposed to the higher maintennance ones near the house.

The bottom paddock, as we've always called it, has sat barren for the last 15 years. We've let our neighbours sheep through it once or twice to get the vegetation down so the paddock can act as a firebreak, and we've ploughed it once to turn over the weeds but other than that it's just been a plain old paddock.

On May 25th our neighbour came over to rip some tree roots out with his backhoe. While he was here I snaffled him down to the paddock and ..voila! 5 minutes later a swale was brought into existence. It was so quick and easy with the machinery. It would have taken me weeks to dig it by hand. The swale isn't very long - about 8m. It should affect 1/3 of the paddock - which is intentional. Small nucleus to start, work outwards from there in years to come.


So, following the suggestions in Geoff Lawtons's '7 Food forests in 7 minutes' clip, I planted 3 pecans below the swale. Wide enough that their canopies should just touch when full grown. Next I sowed a winter cover crop, 1 metre up from the swale, along the mound and for about 5 metres below the swale. this should stop erosion from the mound and start providing some good ground cover. I also planted a few sweet potato cuttings.

Last night, 31st May, we had a lovely storm come over and I was dying to go down and see the swale in action, but there was so much lightning it wasn't a good time. This is the swale at 7am this morning however....

 The sand  in the bottom left hand corner is the run off from the new path the water created to to swale. Now that there is a ridge, there shouldn't be this much erosion in future rains.
 The swale is a little lower at one side - which I need to remedy however, this photo shows how deep the water seems to have been at one point (40cm). The black is silty mud which would have settled at it drained.
And here are the grains from the winter cover crop, swelling nicely in this moisture. The grains are a mix of vetch, lupins and a few others I'm not sure of.

And now we wait, for some growth, and if we're lucky, some more rain!


Sunday, May 6, 2012

Bio-Char Experiment

I've been reading a lot about Terra Pretta and I have to say it's fascinating. I remember as a kid 'playing' at gardens and 'fertilising' our little crops with ash because that's what we had. I remember the peas doing pretty well.
In any case, I'm giving this a go again. Spent the morning collecting the bounties left from our Spring Equinox bonfire - plenty of ash, bits of clay, and lots of charcoal. Have mushed it up and mixed it with Green Life Soil company's veggie mix (manure, compost, minerals etc), then dug it in with a trowel in pockets through the beds. If it's all it's cracked up to be, the fertility of our soil should show marked improvement over the next few years. Which would be nice, as despite the amendments we made last season, a hot, dry season has seen it all disappear. Looking forward to seeing this through. :)

Monday, April 2, 2012

Photos for Molly!

Ok! I know a poke in the ribs when I feel one!

Photos!

Left: The sweet potatoes starting to sprawl in the new part of the food forest.

A pumpkin, which took it upon itself to climb up and over the shadehouse and deposit this gift at the entrance.


Below: A Eureka Lemon in close proximity to our Pancakes for Breakfast spot!


Far left: The new pond, potentially.

Left: This is the view to the left of the sweet potato patch. The pond is located roughly in the foreground before the metal structure you can see.


There you go Molly!

Tuesday, March 20, 2012

Progress check

It's been a while since posts so I thought a progress check was in order. We moved the chook pen away from the fence near the carport, and planted up the area. The plan is to keep adding to its perimeter until this patch joins up with the existing food forest site.
Sweet potato is my favourite addition to the garden at the moment. It sprawls everywhere and transforms dry ground into lushlooking greenery. As a living mulch it is definitely providing some protection to the soil from the sun. The leaves wilt during the hottest part of the day but recover in the evening. We've been eating them in stirfries and as spinach in other dishes.

I've started a pond but am waiting on cooler weather to finish it off. And I've sown a stack of seeds and am hoping that my growing expertise in this area will mean a more successful year this year.... well one can only hope.

The place is growing, changing, becoming more lush, very very slowly. Just needs time. :)